In case you’re new to ChromeOS or have not had a must print from a Chromebook but, don’t be concerned — it is easy. Google designed Chromebooks to simplify computing whereas preserving these low-cost gadgets highly effective and versatile sufficient for many every day wants.
Typically talking, the method is about the identical as it’s with every other pc. If in case you have any hassle, it is also doable to fall again on the Android subsystem constructed into trendy Chromebooks. Android enjoys higher assist from printer producers than ChromeOS.
Connecting a printer to your Chromebook is fairly easy by way of Settings, however ChromeOS has a distinct format than Home windows and macOS. Right here’s how one can arrange a wired or wi-fi printer to print out of your Chromebook.
If you do not have a printer but or are contemplating a brand new mannequin, it is best to try our information to the most effective Chromebook-compatible printers you should purchase. That may make every little thing a bit of bit simpler.
Arrange your printer with Wi-Fi
In case you don’t have already got your printer in your wi-fi community, you may possible use the embedded contact show or a smartphone app to stroll your self by way of the setup wizard. In any other case, you’ll want the handbook, which you’ll be able to obtain from the producer’s web site.
In case you don’t have the choice to make use of wi-fi printing, skip to the subsequent part. In any other case, begin by turning the printer on and ensuring that it’s functioning appropriately and related to the wi-fi community.
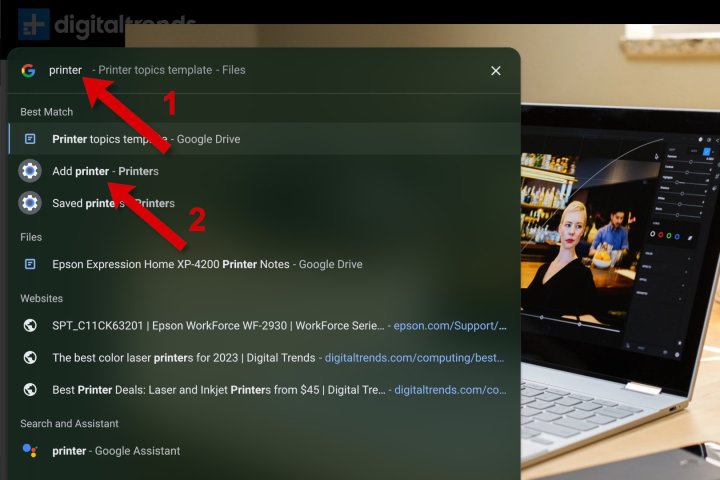
Step 1: Open the Launcher by choosing the spherical button on the backside left.
Step 2: Begin typing “printer” within the search field on the prime of the launcher, then choose Add printer from the Finest Match record under.
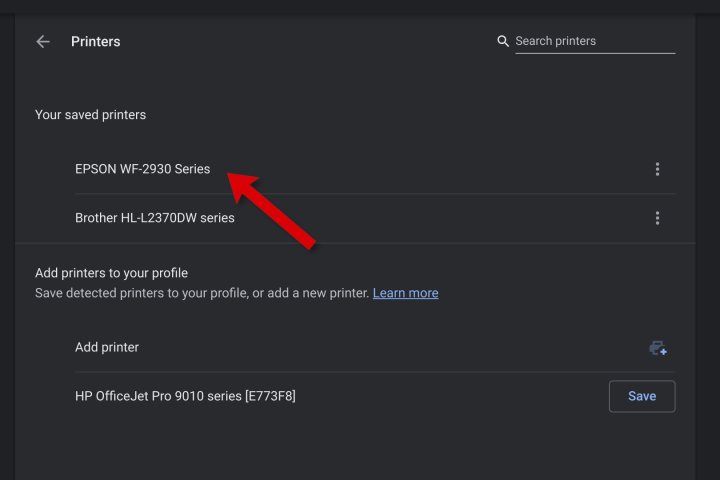
Step 3: In case you’ve already added printers, they are going to be proven in a listing of saved printers. Just under, you may see printers you may Save or Set Up.
You may discover the HP OfficeJet Professional 9015e (proven because the 9010 sequence) within the record, and it really works effectively with a Chromebook. The Epson WorkForce WF-2930 can be choice.
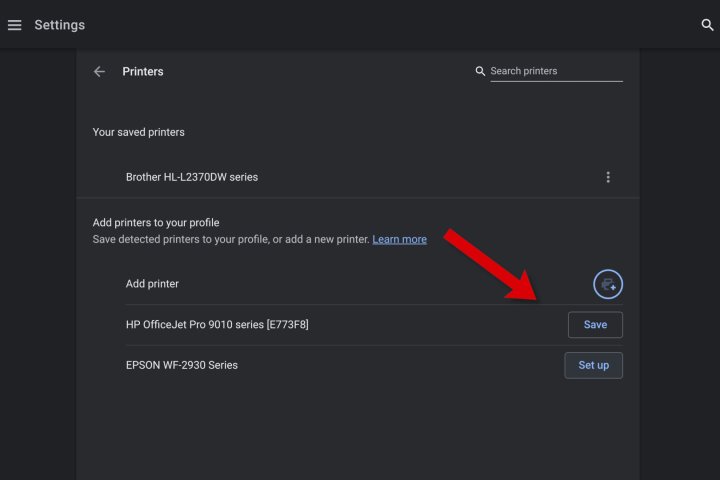
Step 4: Choose Save or Arrange so as to add these printers to your saved record in order that they’ll seem as an choice when that you must print a photograph or doc.
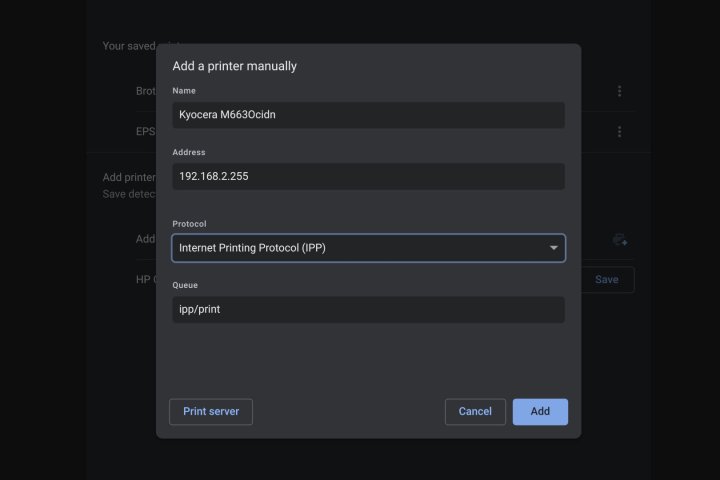
Step 5: In case your printer doesn’t robotically seem, click on the blue Plus icon to the best of Add Printer. A pop-up window seems so that you can enter a reputation, the printer’s IP deal with, the protocol (usually IPP), and the queue (usually ipp/print).
The printer producer’s web site ought to be capable of inform you which protocol to make use of and the way to discover your printer’s IP deal with.
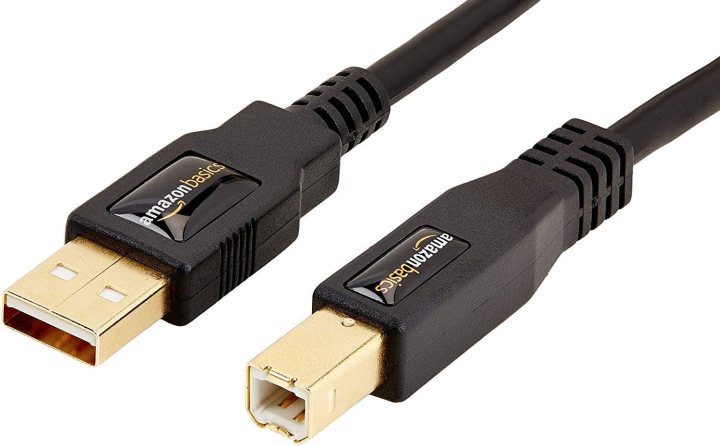
Arrange your printer with a USB cable
In case your printer is older and doesn’t assist Wi-Fi connections, you may arrange your printer utilizing a USB cable. Nonetheless, this technique might not work on older printers as a result of you may’t set up software program or drivers on a Chromebook.
It is usually a lot simpler to make use of Wi-Fi. Although many trendy printers assist USB connections, the required cable isn’t included.
Step 1: Join your printer’s USB cable to the suitable port on the Chromebook. You might want a USB-A to USB-C adapter, relying on the Chromebook mannequin. Additionally, confirm that the printer is on and functioning usually.
Amazon Fundamentals
Step 2: As soon as plugged in, a notification will seem, offering additional directions.
Find out how to print on a Chromebook
Now that your printer is all arrange, you’re able to print out of your Chromebook.
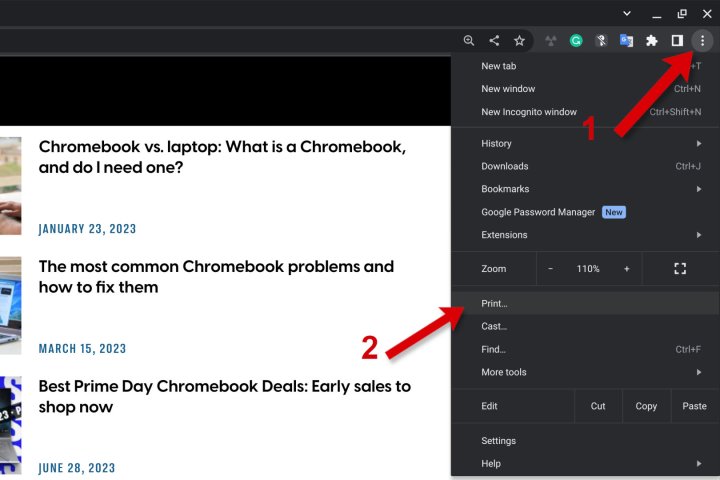
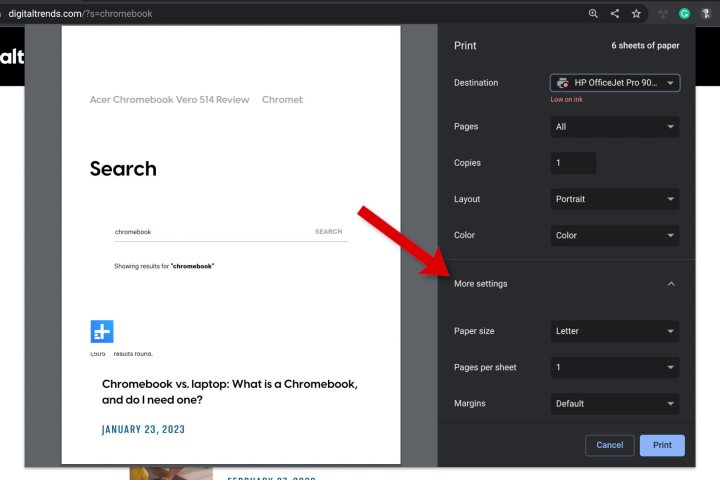
Step 1: Open the web page or picture that you must print and press the Ctrl + P keys concurrently. Alternatively, you may choose the three vertical dots on the top-right nook and choose Print from the drop-down menu.
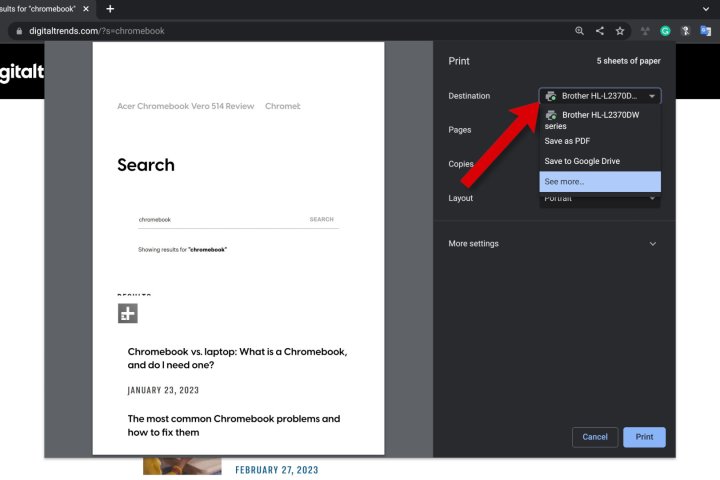
Step 2: A pop-up window will present printing choices. In case you do not see the printer you need beside Vacation spot, choose the down arrow and select the printer you like.
Step 3: Choose Extra settings to see extra choices.
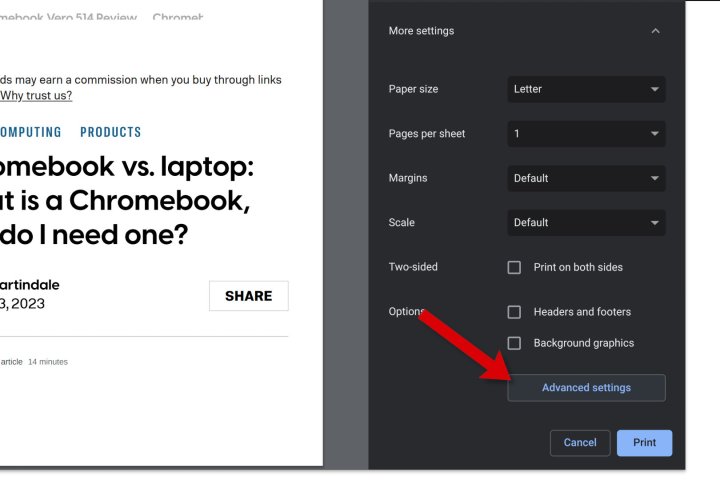
Step 4: Scroll all the way down to see all the controls. Choose Superior settings for much more choices.
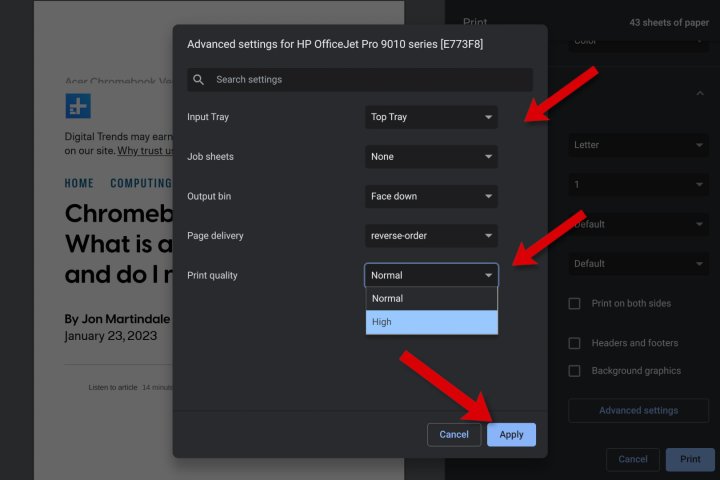
Step 5: A brand new window opens the place you may select enter and output trays, your most popular Print high quality, and extra. Choose Apply to get again to the print window.
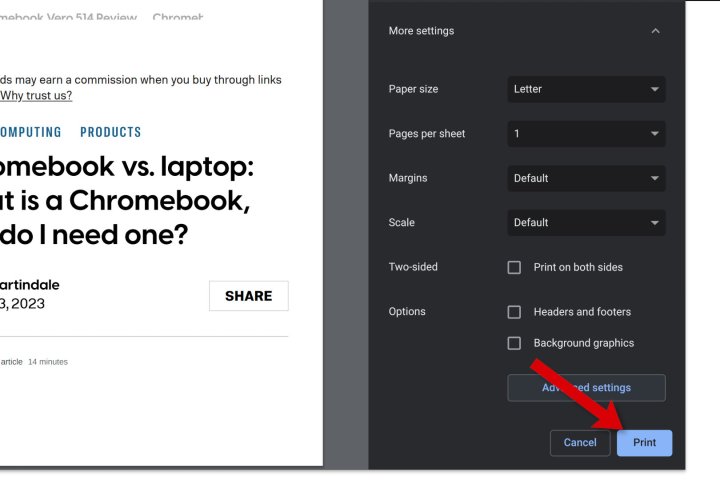
Step 6: When every little thing is ready the way in which you need, choose the Print button to start out printing.
Scan together with your all-in-one printer
A Chromebook also can hook up with a scanner or all-in-one printer that features a scanner.
Step 1: Choose the system clock positioned within the bottom-right nook and ensure your Chromebook is related to the identical community because the printer.
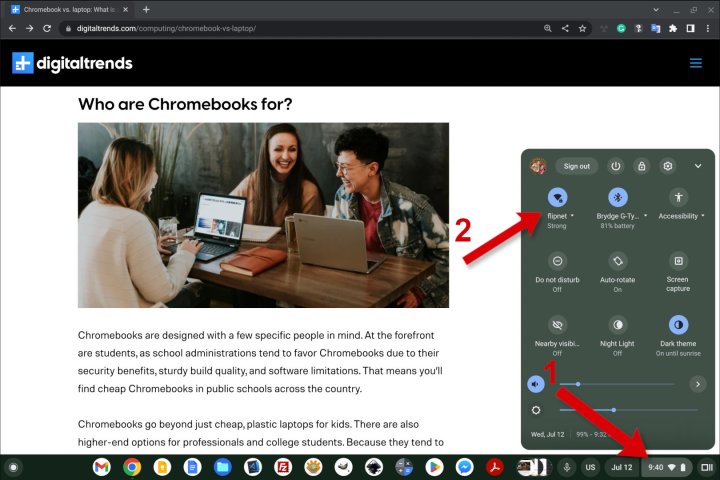
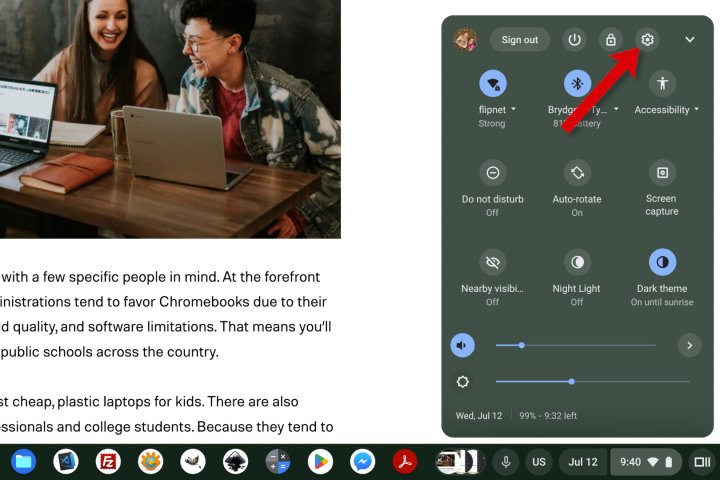
Step 2: With the pop-up menu nonetheless lively, click on the gear icon.
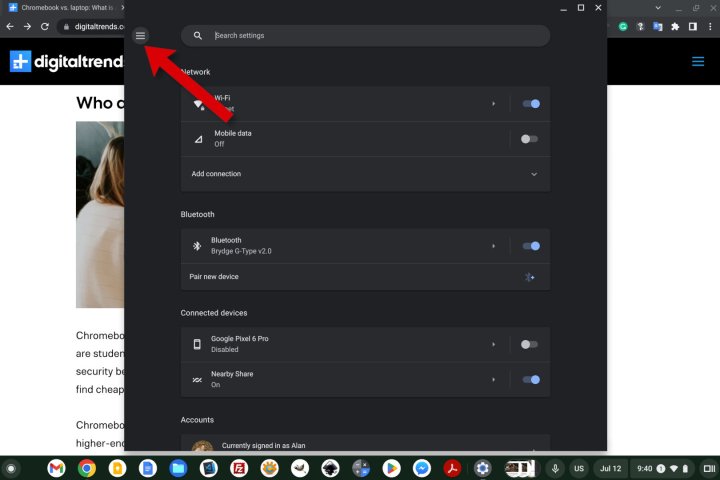
Step 3: The Settings window will seem. Open the left sidebar by choosing the three traces on the prime left.
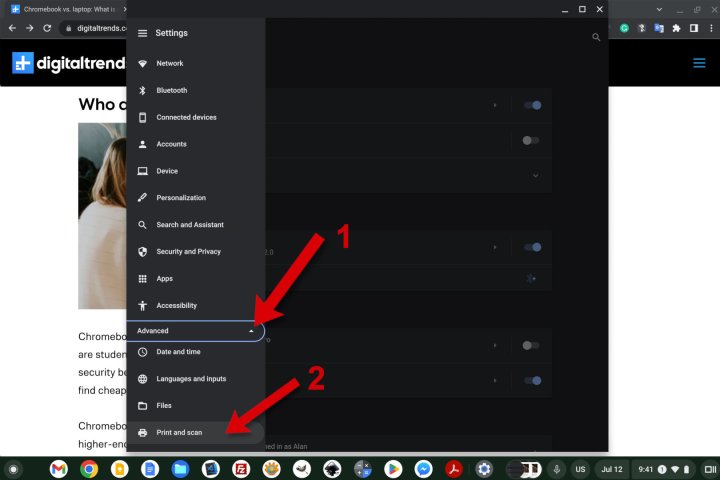
Step 4: Choose the down arrow subsequent to Superior to develop the menu., then select Print and scan to open printer settings.
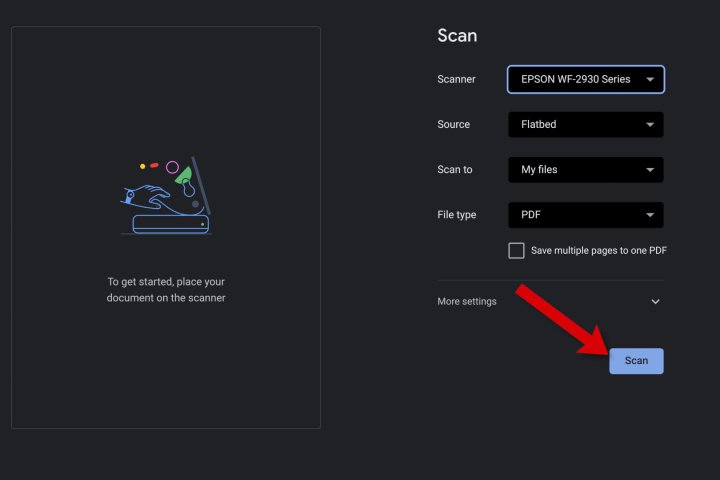
Step 5: Choose the Scan choice to open a window with controls for scanning.

Step 6: The Scan window will allow you to select your scanner or all-in-one printer and different particulars. If you’re prepared, choose the Scan button.
Print with an Android app
If in case you have any hassle accessing your printer or some options aren’t obtainable by way of ChromeOS, you may simply set up the printer producer’s Android app. Then you may entry all the similar capabilities you may out of your smartphone.
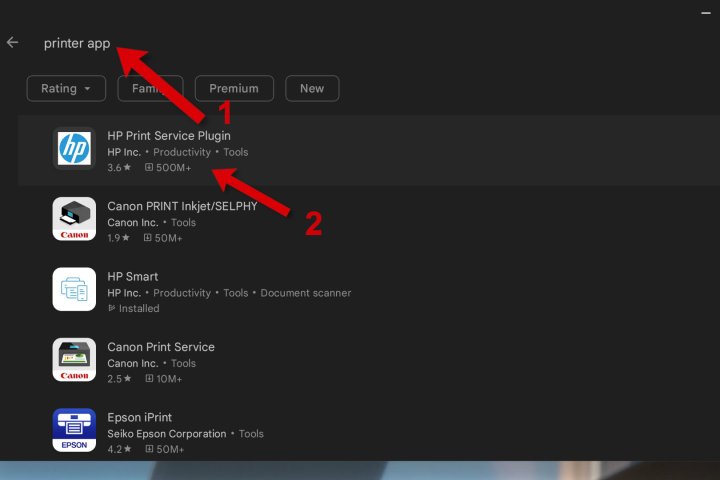
Step 1: Select the Launcher within the bottom-left nook of the display screen to open a search. Start typing “Play Retailer” and choose the app once you see it.

Step 2: Within the Play Retailer, sort the producer of your printer or just “printer app” and browse the record to search out the proper app. HP, Epson, Canon, Brother, and extra will probably be obtainable.
Step 3: After putting in the proper app in your printer, open it and observe the producer’s directions to attach and start printing.

As soon as you understand how to print from a Chromebook and entry particular options of your printer from an Android app operating on ChromeOS, you may be capable of rethink whether or not you continue to want a Home windows PC or a Mac. The very best Chromebooks are correct computer systems now, however stay inexpensive and simpler to keep up. Add a printer and out of the blue, you may care for all kinds of workplace and college work even when your price range is tight.
Editors’ Suggestions